Llama 2 is an open-source large language model (LLM) developed by Meta. It is a competent open-source large language model, arguably better than some closed models like GPT-3.5 and PaLM 2. It consists of three pre-trained and fine-tuned generative text model sizes, including the 7 billion, 13 billion, and 70 billion parameter models.
You will explore Llama 2’s conversational capabilities by building a chatbot using Streamlit and Llama 2.
Understanding Llama 2: Features and Benefits
How different is Llama 2 from its predecessor large language model, Llama 1?
- Larger model size: The model is larger, with up to 70 billion parameters. This enables it to learn more intricate associations between words and sentences.
- Improved conversation abilities: Reinforcement Learning from Human Feedback (RLHF) improves conversational application abilities. This allows the model to generate humanlike content even in convoluted interactions.
- Quicker inference: It introduces a novel method called grouped-query attention to accelerate inference. This results in its ability to build more useful applications like chatbots and virtual assistants.
- More efficient: It is more memory and computational resource efficient than its predecessor.
- Open-source and non-commercial license: It is open-source. Researchers and developers can use and modify Llama 2 without restrictions.
Llama 2 significantly outperforms its predecessor in all respects. These characteristics make it a potent tool for many applications, such as chatbots, virtual assistants, and natural language comprehension.
Setting Up a Streamlit Environment for Chatbot Development
To start building your application, you have to set up a development environment. This is to isolate your project from the existing projects on your machine.
First, start by creating a virtual environment using the Pipenv library as follows:
pipenv shell
Next, install the necessary libraries to build the chatbot.
pipenv install streamlit replicate
Streamlit: It is an open-source web app framework that renders machine learning and data science applications quickly.
Replicate: It is a cloud platform that provides access to large open-source machine-learning models for deployment.
Get Your Llama 2 API Token From Replicate
To get a Replicate token key, you must first register an account on Replicate using your GitHub account.
Replicate only allows sign-in through a GitHub account.
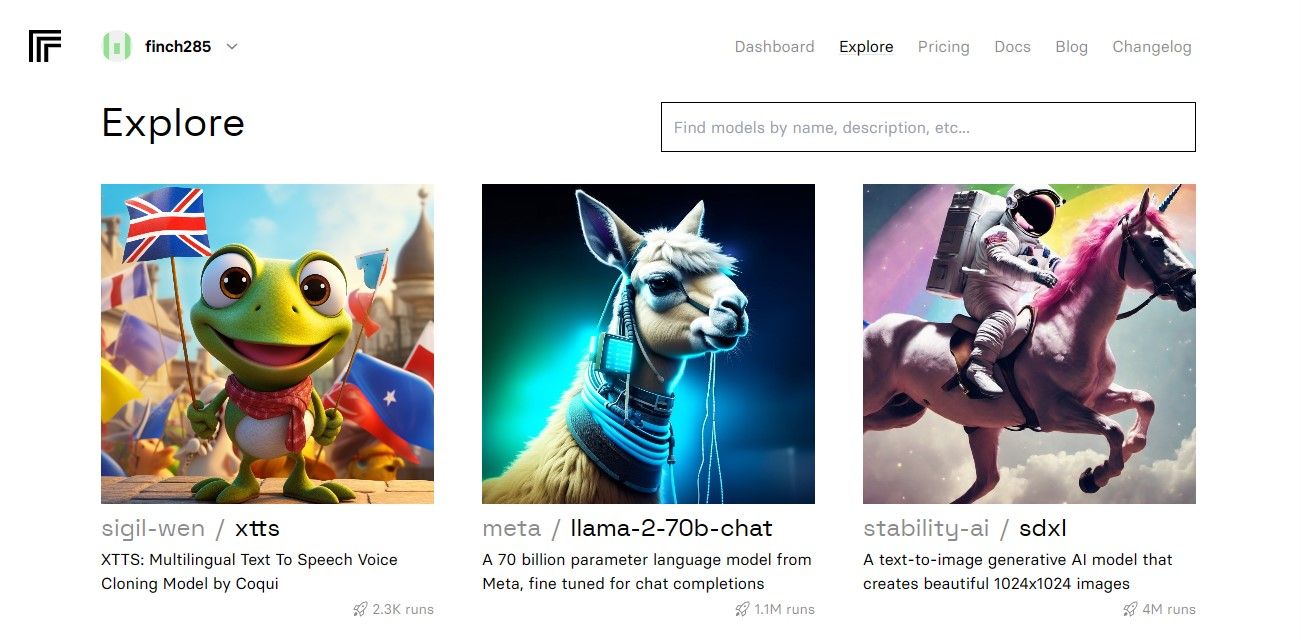
Once you have accessed the dashboard, navigate to the Explore button and search for Llama 2 chat to see the llama-2–70b-chat model.
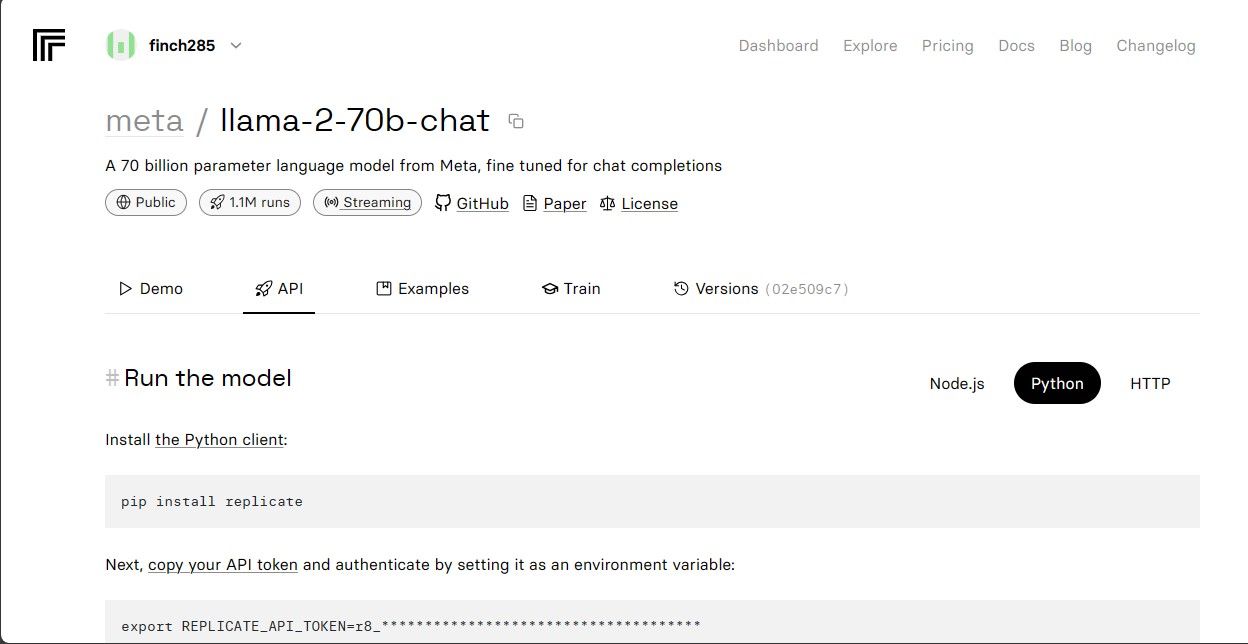
Click on the llama-2–70b-chat model to view the Llama 2 API endpoints. Click the API button on the llama-2–70b-chat model’s navigation bar. On the right side of the page, click on the Python button. This will provide you with access to the API token for Python Applications.
Copy the REPLICATE_API_TOKEN and store it safe for future use.
The full source code is available in this GitHub repository.
Building the Chatbot
First, create a Python file called llama_chatbot.py and an env file (.env). You will write your code in llama_chatbot.py and store your secret keys and API tokens in the .env file.
On the llama_chatbot.py file, import the libraries as follows.
 import streamlit as st
import os
import replicate
Next, set the global variables of the llama-2–70b-chat model.
 # Global variables
REPLICATE_API_TOKEN = os.environ.get('REPLICATE_API_TOKEN', default='')

# Define model endpoints as independent variables
LLaMA2_7B_ENDPOINT = os.environ.get('MODEL_ENDPOINT7B', default='')
LLaMA2_13B_ENDPOINT = os.environ.get('MODEL_ENDPOINT13B', default='')
LLaMA2_70B_ENDPOINT = os.environ.get('MODEL_ENDPOINT70B', default='')
On the .env file, add the Replicate token and model endpoints in the following format:
 REPLICATE_API_TOKEN='Paste_Your_Replicate_Token'
MODEL_ENDPOINT7B='a16z-infra/llama7b-v2-chat:4f0a4744c7295c024a1de15e1a63c880d3da035fa1f49bfd344fe076074c8eea'
MODEL_ENDPOINT13B='a16z-infra/llama13b-v2-chat:df7690f1994d94e96ad9d568eac121aecf50684a0b0963b25a41cc40061269e5'
MODEL_ENDPOINT70B='replicate/llama70b-v2-chat:e951f18578850b652510200860fc4ea62b3b16fac280f83ff32282f87bbd2e48'
Paste your Replicate token and save the .env file.
Designing the Chatbot’s Conversational Flow
Create a pre-prompt to start the Llama 2 model depending on what task you want it to do. In this case, you want the model to act as an assistant.
 # Set Pre-propmt
PRE_PROMPT = "You are a helpful assistant. You do not respond as " \
            "'User' or pretend to be 'User'." \
            " You only respond once as Assistant."
Set up the page configuration for your chatbot as follows:
 # Set initial page configuration
st.set_page_config(
   page_title="LLaMA2Chat",
   page_icon=":volleyball:",
   layout="wide"
)
Write a function that initializes and sets up session state variables.
 # Constants
LLaMA2_MODELS = {
   'LLaMA2-7B': LLaMA2_7B_ENDPOINT,
   'LLaMA2-13B': LLaMA2_13B_ENDPOINT,
   'LLaMA2-70B': LLaMA2_70B_ENDPOINT,
}

# Session State Variables
DEFAULT_TEMPERATURE = 0.1
DEFAULT_TOP_P = 0.9
DEFAULT_MAX_SEQ_LEN = 512
DEFAULT_PRE_PROMPT = PRE_PROMPT

def setup_session_state():
   st.session_state.setdefault('chat_dialogue', [])
   selected_model = st.sidebar.selectbox(
       'Choose a LLaMA2 model:', list(LLaMA2_MODELS.keys()), key='model')
   st.session_state.setdefault(
       'llm', LLaMA2_MODELS.get(selected_model, LLaMA2_70B_ENDPOINT))
   st.session_state.setdefault('temperature', DEFAULT_TEMPERATURE)
   st.session_state.setdefault('top_p', DEFAULT_TOP_P)
   st.session_state.setdefault('max_seq_len', DEFAULT_MAX_SEQ_LEN)
   st.session_state.setdefault('pre_prompt', DEFAULT_PRE_PROMPT)
The function sets the essential variables like chat_dialogue, pre_prompt, llm, top_p, max_seq_len, and temperature in the session state. It also handles the selection of the Llama 2 model based on the user's choice.
Write a function to render the sidebar content of the Streamlit app.
 def render_sidebar():
   st.sidebar.header("LLaMA2 Chatbot")
   st.session_state['temperature'] = st.sidebar.slider('Temperature:',
         min_value=0.01, max_value=5.0, value=DEFAULT_TEMPERATURE, step=0.01)
   st.session_state['top_p'] = st.sidebar.slider('Top P:', min_value=0.01,
         max_value=1.0, value=DEFAULT_TOP_P, step=0.01)
   st.session_state['max_seq_len'] = st.sidebar.slider('Max Sequence Length:',
         min_value=64, max_value=4096, value=DEFAULT_MAX_SEQ_LEN, step=8)
   new_prompt = st.sidebar.text_area(
         'Prompt before the chat starts. Edit here if desired:',
          DEFAULT_PRE_PROMPT,height=60)
   if new_prompt != DEFAULT_PRE_PROMPT and new_prompt != "" and
new_prompt is not None:
       st.session_state['pre_prompt'] = new_prompt + "\n"
   else:
       st.session_state['pre_prompt'] = DEFAULT_PRE_PROMPT
The function displays the header and the setting variables of the Llama 2 chatbot for adjustments.
Write the function that renders the chat history in the main content area of the Streamlit app.
 def render_chat_history():
   response_container = st.container()
   for message in st.session_state.chat_dialogue:
       with st.chat_message(message["role"]):
           st.markdown(message["content"])
The function iterates through the chat_dialogue saved in the session state, displaying each message with the corresponding role (user or assistant).
Handle the user's input using the function below.
 def handle_user_input():
   user_input = st.chat_input(
"Type your question here to talk to LLaMA2"
)
   if user_input:
       st.session_state.chat_dialogue.append(
{"role": "user", "content": user_input}
)
       with st.chat_message("user"):
           st.markdown(user_input)
This function presents the user with an input field where they can enter their messages and questions. The message is added to the chat_dialogue in the session state with the user role once the user submits the message.
Write a function that generates responses from the Llama 2 model and displays them in the chat area.
 def generate_assistant_response():
   message_placeholder = st.empty()
   full_response = ""
   string_dialogue = st.session_state['pre_prompt']

   for dict_message in st.session_state.chat_dialogue:
       speaker = "User" if dict_message["role"] == "user" else "Assistant"
       string_dialogue += f"{speaker}: {dict_message['content']}\n"

   output = debounce_replicate_run(
       st.session_state['llm'],
       string_dialogue + "Assistant: ",
       st.session_state['max_seq_len'],
       st.session_state['temperature'],
       st.session_state['top_p'],
       REPLICATE_API_TOKEN
   )

   for item in output:
       full_response += item
       message_placeholder.markdown(full_response + "▌")

   message_placeholder.markdown(full_response)
   st.session_state.chat_dialogue.append({"role": "assistant",
"content": full_response})
The function creates a conversation history string that includes both user and assistant messages before calling the debounce_replicate_run function to obtain the assistant's response. It continually modifies the response in the UI to give a real-time chat experience.
Write the main function responsible for rendering the entire Streamlit app.
 def render_app():
   setup_session_state()
   render_sidebar()
   render_chat_history()
   handle_user_input()
   generate_assistant_response()
It calls all the defined functions to set up the session state, render the sidebar, chat history, handle user input, and generate assistant responses in a logical order.
Write a function to invoke the render_app function and start the application when the script is executed.
 def main():
   render_app()

if __name__ == "__main__":
   main()
Now your application should be ready for execution.
Handling API Requests
Create a utils.py file in your project directory and add the function below:
 import replicate
import time

# Initialize debounce variables
last_call_time = 0
debounce_interval = 2 # Set the debounce interval (in seconds)


def debounce_replicate_run(llm, prompt, max_len, temperature, top_p,
                          API_TOKEN):
   global last_call_time
   print("last call time: ", last_call_time)

   current_time = time.time()
   elapsed_time = current_time - last_call_time

   if elapsed_time < debounce_interval:
       print("Debouncing")
       return "Hello! Your requests are too fast. Please wait a few" \
              " seconds before sending another request."

   last_call_time = time.time()

   output = replicate.run(llm, input={"prompt": prompt + "Assistant: ",
                                      "max_length": max_len, "temperature":
                                          temperature, "top_p": top_p,
                                      "repetition_penalty": 1}, api_token=API_TOKEN)
   return output
The function performs a debounce mechanism to prevent frequent and excessive API queries from a user’s input.
Next, import the debounce response function into your llama_chatbot.py file as follows:
from utils import debounce_replicate_run
Now run the application:
streamlit run llama_chatbot.py
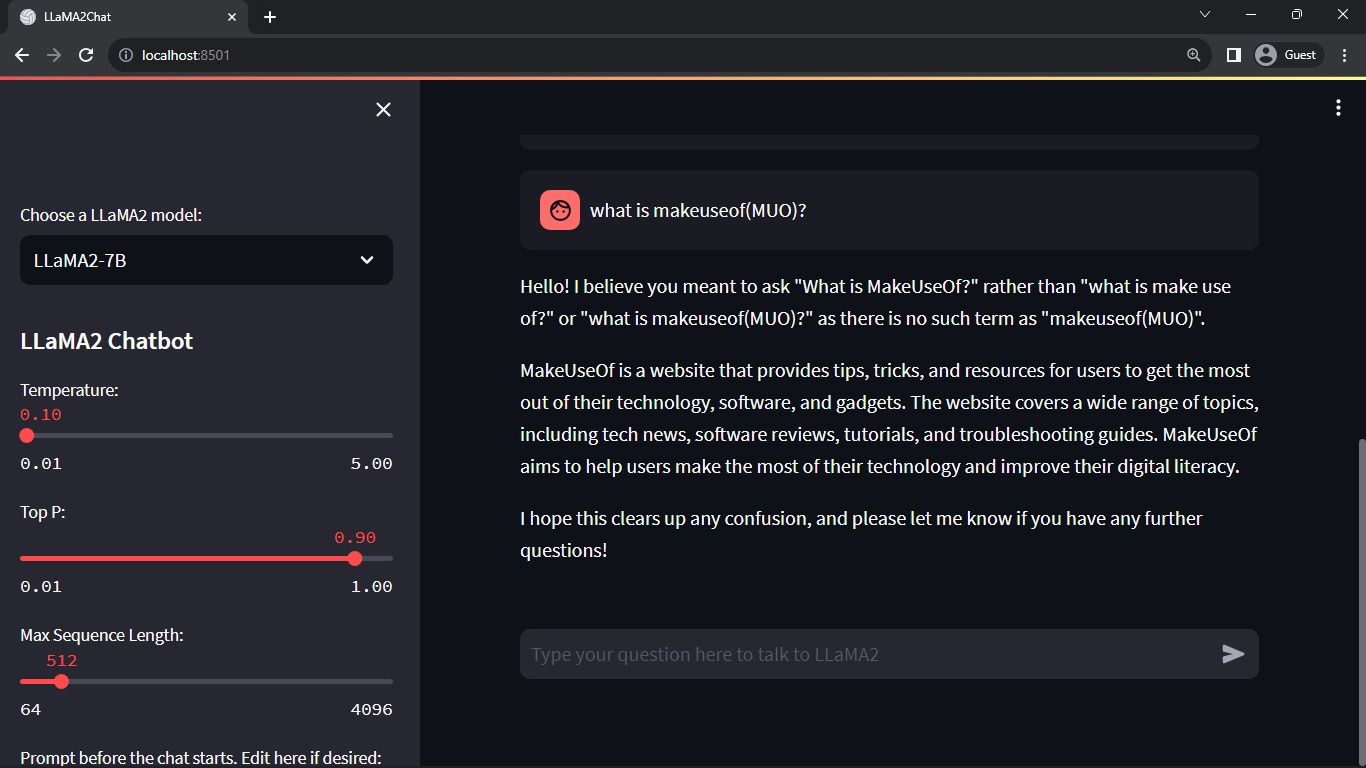
Expected output:
The output shows a conversation between the model and a human.
Real-world Applications of Streamlit and Llama 2 Chatbots
Some real-world examples of Llama 2 applications include:
- Chatbots: Its use applies to creating human response chatbots that can hold real-time conversations on several topics.
- Virtual assistants: Its use applies to creating virtual assistants that understand and respond to human language queries.
- Language translation: Its use applies to language translation tasks.
- Text summarization: Its use is applicable in summarizing large texts into short texts for easy understanding.
- Research: You can apply Llama 2 for research purposes by answering questions across a range of topics.
The Future of AI
With closed models like GPT-3.5 and GPT-4, it is pretty difficult for small players to build anything of substance using LLMs since accessing the GPT model API can be quite expensive.
Opening up advanced large language models like Llama 2 to the developer community is just the beginning of a new era of AI. It will lead to more creative and innovative implementation of the models in real-world applications, leading to an accelerated race toward achieving Artificial Super Intelligence (ASI).


